Durkopp Adler 261 sewing machine fault code meaning
Oct 27, 2023
2. Foot pedal sensitivity adjustment
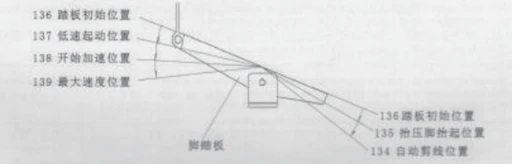
As shown in the figure, the machine foot pedal action starts from the starting position 1 (parameter 136), slowly steps forward to 2 (parameter 137) to start low-speed sewing, continues to step forward to 3 (parameter 138) to start accelerating, and then deeply steps forward to 4 (parameter 139) to reach the maximum speed. 2-3 segments to maintain the sewing speed between the seams and 3-4 segments for the step-less speed regulation process.
When the foot pedal starts from the initial position 1 (parameter No. 136) and slowly steps back to 5 (parameter No. 135), the presser foot will be lifted up automatically; when the foot pedal starts from the initial position 1 (parameter No. 136) and slowly steps back to 6 (parameter No. 134), the thread trimming action will be completed automatically.
The adjustment method of each parameter is shown in Fig. 1, press the 3 key +11 key, and each parameter setting should ensure that the 134th parameter <135th parameter <136th parameter <137th parameter <138th parameter <139th parameter, the above parameter can be monitored by the 025th parameter in real time under the monitoring mode, and the sampling value of the foot pedal under different positions is used as the reference value of each parameter. Adjusting the corresponding parameter, the position of lifting the presser foot and the action of the front or backpedal will be changed accordingly. If the front step a great distance from the machine has not been running, can be appropriate to reduce the parameters of the 137 (not less than the return to the center of the position parameters of the 136), you can improve the front step to start sensitivity; if the machine is too sensitive, lightly touch the foot pedal the machine will begin to run, can be appropriate to increase the parameters of the 137; if it is not easy to make up for the needle, a little front step, the speed will be rapidly increased resulting in the front punch more needles, can be appropriate to increase the parameters of the 138 or reduce the 137 (i.e., increase the parameters). 137 parameter (i.e. increase the low-speed range of the foot pedal), you can also reduce the initial starting speed (100 parameters).
3. The meaning of the main fault (alarm) code and troubleshooting methods
|
Fault (Alarm) Codes |
Code Meaning |
Causes and Troubleshooting |
|
Error:01 |
hardware overcurrent |
Machine mechanical failure jammed, long time use of heat protection or overload, to rule out mechanical problems, turn off the power, 30 seconds after the re-opening. If it is not excluded, check whether the power supply of the circuit board is normal or replace the controller. |
|
Error:02 |
software overcurrent |
If the machine has been used for a long time or the adjustment parameters are wrong, turn off the power and restart the machine after 30 seconds or restore the factory default settings. If it is not eliminated, check whether the power supply of the circuit board is normal or replace the controller. |
|
Error:06 |
Solenoid circuit failure |
Turn off the power, check whether the solenoid connection line is correct, whether the plug is loose, or broken, and if there is a timely plug or replace the connection line, if the fault is still not eliminated then replace the controller. |
|
Error:08 |
Main motor blocking |
Check whether the machine lacks lubricating oil or the drive shaft is entangled by threads and other foreign objects, check whether there are threads or broken needles and other foreign objects jammed in the rotating shuttle; turn off the power, check whether the motor power input plug is dislodged, loose or broken, and check the relevant parts for maintenance or replacement of parts. |
|
Error:09 |
Brake circuit failure |
Turn off the power, check whether the white braking resistor connector on the power board is loose or off, re-insert it tightly, and turn on the power again, if it still does not work properly then replace the controller. |
|
Error:10 |
HMI communication failure |
Check the control panel and controller wires are not off, loose, or broken, will be serviced normally after restarting the system, such as still can not work properly then replace the controller. |
|
Error:11 |
Failure of machine head stop signal |
Check whether the synchronization signal device and the controller of the connecting wire plug is loose, and will be repaired after restarting the system, such as still can not work properly, then replace the controller. |
|
Error:13 |
Motor HALL Failure |
Turn off the power, and check whether the motor sensor connector is loose or off, will be serviced normally after restarting the system, if it still does not work properly then replace the controller. |
|
Warm:01 |
Low lubricant alarm |
Press the P key to temporarily cancel the alarm, be sure to fill the appropriate amount of special lubricant in time. |
|
Warm:02 |
Stitch counter alarm |
Indicates that the number of stitches used has reached the set value, so press the P key to cancel the reset. |
|
Warm:03 |
Piece counter alarm |
Indicates that the number of pieces used has reached the set value, so press the P key to cancel the reset. |
if you need to buy Durkopp Adler 261, please contact us at sales@dapsew.com